Scoop & Co
This page describes how I'm current-ly using Scoop (and other Package Managers) to configure my system
The Daddy... Scoop!
Get scoop.sh and check out the Scoop Home Page (which seems to have superceded the wiki) for latest info - or see below for the TL;DR
Scoop focuses on open-source, command-line developer tools" but then those are the kinds of tools I'm using more and more... ...You're familiar with UNIX tools, and you wish there were more of them on Windows
from: github.com/lukesampson/scoop/wiki/Chocolatey-Comparison
Install scoop and base set of tools
Set-ExecutionPolicy RemoteSigned -Scope CurrentUser
Invoke-Expression (New-Object System.Net.WebClient).DownloadString('https://get.scoop.sh')
scoop help

scoop install 7zip git git-filter-repo
scoop install sudo
scoop install aria2 lessmsi innounp
scoop install curl grep sed less nano bind
scoop install coreutils
# vim
scoop install vim
'
set ff=unix

set cindent
set tabstop=4
set shiftwidth=4
set expandtab
set backupdir=$TEMP
' | out-file ~/.vimrc -enc oem -append
coreutils is a multi-tool package - "a collection of GNU utilities such as bash, make, gawk and grep based on MSYS"
Tip
you can use the Unix tool ls after installing coreutils but you first need to remove the PowerShell alias already in place
i.e. add this to your Powershell $profile:
scoop install pwsh
...switch to powershell core
#powershell 6 and above
Remove-Alias -Name ls
Remove-Alias -Name cat
Remove-Alias -Name mv
Remove-Alias -Name ps
Remove-Alias -Name pwd
Remove-Alias -Name rm
Buckets
Then, I add additional Buckets. Buckets are collections of apps which are additional / optional to the main bucket
scoop bucket add extras
scoop bucket add versions
scoop bucket add Sysinternals 'https://github.com/Ash258/Scoop-Sysinternals.git'
Then yet more handy tools I use (some are from the extras bucket):
scoop install vscode azure-cli azure-ps storageexplorer dotnet-sdk
scoop install go lua docker kubectl helm make
scoop install nodejs nvs yarn openssl
scoop install azure-functions-core-tools
scoop install vcredist2019
scoop install notepadplusplus windows-terminal postman
scoop install paint.net
scoop install gh

scoop bucket add instrumenta https://github.com/instrumenta/scoop-instrumenta
scoop install kubeval
scoop install conftest

# SysInternals (now in extras bucket)
scoop install sysinternals

#scoop install krita brackets

# Used to install with scoop but are now in PSGallery
Install-PackageProvider -Name NuGet -MinimumVersion 2.8.5.201 -Force -Scope CurrentUser
Install-Module posh-git -Scope CurrentUser
Install-Module oh-my-posh -Scope CurrentUser
Info
Other useful (possibly useful?) buckets that I've not yet had a use for:
- nonportable - non-portable Applications that need to retain state between versions
- full list of known buckets
Paths
Referencing the path to an application installed by Scoop
%UserProfile%/scoop/apps
Note
Those installed with the --global (and with the sudo command) will reside in the path
%ProgramData%/scoop/apps
For each version of an application the files will be in a directory with the version number, but Scoop creates a Shim for the current version in the path %UserProfile%\scoop\apps\{AppName}\current.
For example: the path to Python (python.exe) will be either:
%UserProfile%\scoop\apps\python\3.8.1\python.exe
%UserProfile%\scoop\apps\python\current\python.exe
For system tools you'll probably want to use the current shim to avoid those tools breaking between updates.
Specifying Application Versions
The versions bucket contains a way to obtain versions other than the latest version of an application. This is used in combination with scoop reset command to switch between versions of an app. Scoop creates a shim for each version and scoop reset switches the current shim between those versions.
For example: Switching-Ruby-And-Python-Versions
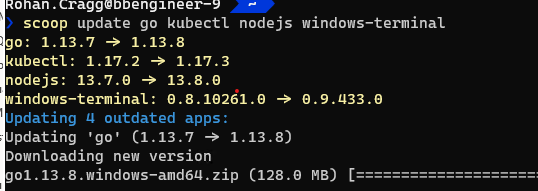
Updating Applications
scoop status is used to display any available updates:
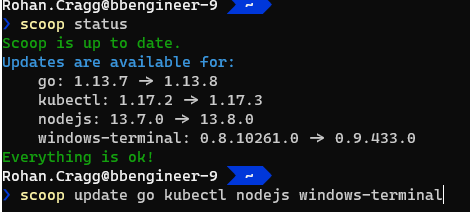
...and then scoop update is used to update one or more applications (in a single command if you like!).
Other miscellany
Multi-Connection Downloads
Downloads can be speeded up by using Aria2. See also lukesampson/scoop#multi-connection-downloads-with-aria2
MSI extraction
If installed, scoop can be prevented from using it if necessary by running scoop config aria2-enabled $false
I had a problem installing Brackets and it was resolved by installing LessMSI - but at the moment I'm not sure why...
!!!info What is LessMSI? A tool to view and extract the contents of a Windows Installer (.msi) file.
scoop install lessmsi
scoop config MSIEXTRACT_USE_LESSMSI $true
Common Pre-Requisites
The following is a set of common pre-requisites for installing tools and utilities (e.g. the pip package manager for python tools):
Python and PIP
scoop install python miniconda3
scoop install curl
curl https://bootstrap.pypa.io/get-pip.py -o get-pip.py
python get-pip.py
# pip and other tools be later upgraded by re-running the above or running:
python -m pip install -U pip
# when running behind a corporate propxy, the following command should still work:
sudo pip install --upgrade --trusted-host pypi.org --trusted-host files.pythonhosted.org pip setuptools wheel
System Fonts
Here's another place where Scoop comes to the rescue to avoid clunky download and installs for system fonts!
Info
note how sudo is being used to install the font as a global / system font - this obvisouly pops up a UAC prompt as it requires elevated provilege to install a system font...
scoop bucket add nerd-fonts
sudo scoop install Delugia-Nerd-Font-Complete Cascadia-Code Meslo-NF Meslo-NF-Mono
Productivity Tools
MkDocs
MkDocs "Project documentation with Markdown"
I use this for writing this site!:
pip install mkdocs
python .\scoop\apps\python\current\Tools\scripts\win_add2path.py
Install the Custom Theme
Using Material theme and dependencies for CodeHilite
pip install mkdocs-material
pip install pygments # for source code syntax highlighting
PowerSession
This a version of asciinema for recording and re-playing PowerShell terminal sessions. Once recorded you upload the recording and share it with the world!
What is asciinema and how do I get it?!
If you've never used asciinema before and you want to share a demo of something at a terminal then you'll love this tool.
- Simply go to asciinema.org/
- click on Log in / Sign up
- Enter an email address
- Click on the link in the confirmation email
- Choose a username
- Stay logged into that browser on that machine and you can then
PowerSession authto create a link between the terminal and your asciinema account
Apparently tt's based on Windows Pseudo Console (ConPTY).
# Installation
scoop install PowerSession

# Usage: Log in on the machine where you want to make a recording
Powersession auth
# ... copy the URL you're given and paste it into your browser as instructed

# Record a Terminal session (it will open a new session for you)
PowerSession rec a.txt

# Play back the recording to check that it's OK to upload
PowerSession play a.txt

# If it's ok then
PowerSession upload a.txt
An example of an uploaded recording looks like this!